Use the Create a DVT Wizard
A videographer is creating a DVT and moving through each of the steps in the wizard.
The Create a DVT wizard can be opened from the SYNC Start Page or the Transcript view. For more information on how to start this process, view the Create a DVT article.
 Note: There are differences between the wizard on the desktop application for TrialDirector 360 and TrialDirector360.com. The differences that appear on TrialDirector360.com are noted in the steps that follow.
The Create a DVT wizard contains these steps:
- Select DVT Files
- Synchronization Options
- Express Same Day - 75.00/Video Hour
- Express 24 Hour - 35.00/Video Hour
- Express 48 Hour - 25.00/Video Hour
- Standard 3-5 Day - 15.00/Video Hour
- DVT Summary
- DVT Information
- Sync Options
- Media Files to be Synced
- Processing
- Authorizing
- Processing
- Finalizing
- Confirmation
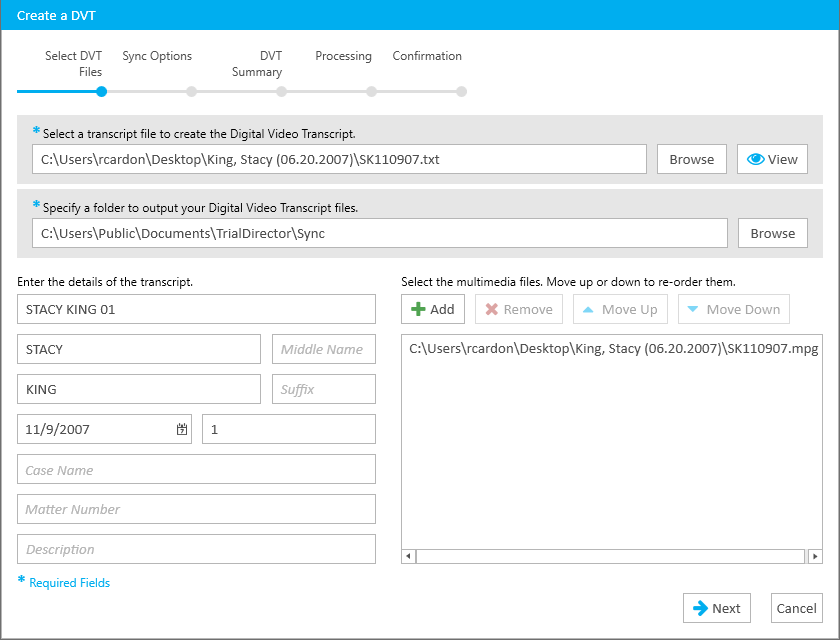
Here, the videographer chooses the deposition transcript file by clicking the top Browse button. When she opens the file from the browse window, the file path appears in the top field.
Note: On TrialDirector360.com, the videographer simply clicks the Add button and opens both the transcript and multimedia files she needs.
The wizard will attempt to populate the transcript details. The videographer verifies the information and fills in any additional details she may need.
The videographer then chooses where to store the output files after the synchronization is complete.
Before she can continue the creation process, she must enter a unique job name. For example, she enters the first and last initials of the deponent along with the date and volume number.
If the media files are stored in the same folder as the transcript, and if the user preference is activated, they will automatically be associated with the transcript. The videographer can also choose the corresponding multimedia files with the Add button above the list field. The multimedia files appear in this field.
Note: Again, on TrialDirector360.com, use the Add button to choose both the transcript and multimedia files. All the files will appear in the same list field.
If there is more than one file, the videographer ensures the files are in the correct chronological order. If a file appears out of place, she selects the file and uses the Move Up and Move Down buttons to position it correctly.
The synchronization engine processes the transcript according to the order of these files. If a file appears out of order the synchronization will be incorrect.
To move on, the videographer clicks Next.
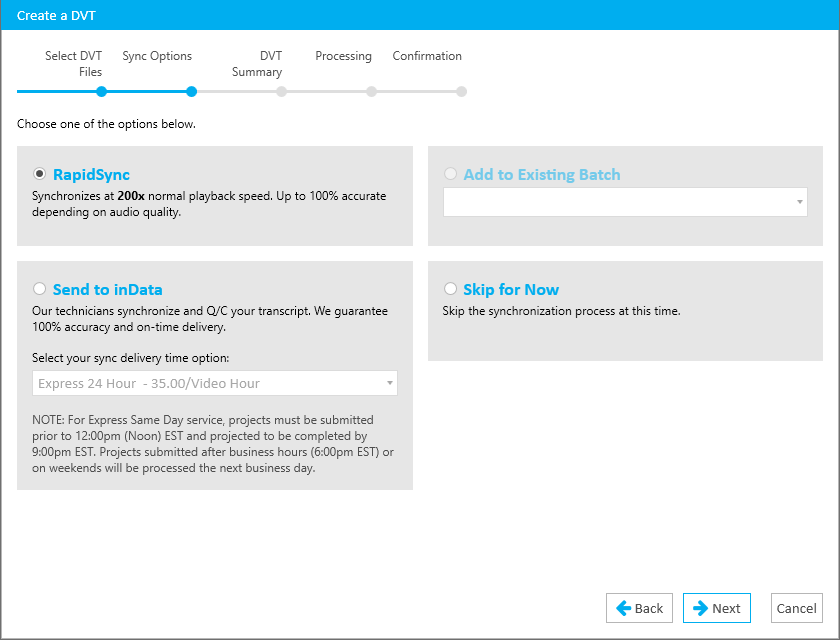
There are several synchronization options:
RapidSync
Syncs the videographer’s transcript and multimedia files at up to 200 times normal playback speed and is up to 100% accurate depending on the audio quality. This is the fastest option for creating a DVT.
Add to Existing Batch
The videographer often syncs transcripts and video for depositions in bulk. She can add the DVT to an existing batch to be synchronized at a scheduled time.
If the videographer selects this option, she can choose an existing batch from the dropdown menu. If she can’t find a batch she wants to place it in, she can create a new one in the Batch Manager.
Note: This option is not available on TrialDirector360.com.
Send to inData
The videographer sometimes elects to send her synchronization jobs to inData where technicians synchronize and quality check the DVTs personally to guarantee 100% accuracy and on-time delivery.
The videographer selects the delivery time options from the dropdown. Delivery time options include:
Skip For Now
The videographer chooses this option to defer the synchronization of the transcript until a later time.
Note: If the videographer uses a transcript with timecodes already assigned to each line, she can preserve the timecodes using the Skip For Now option in the wizard, or overwrite the timecodes with the RapidSync option.
To continue, the videographer clicks Next.
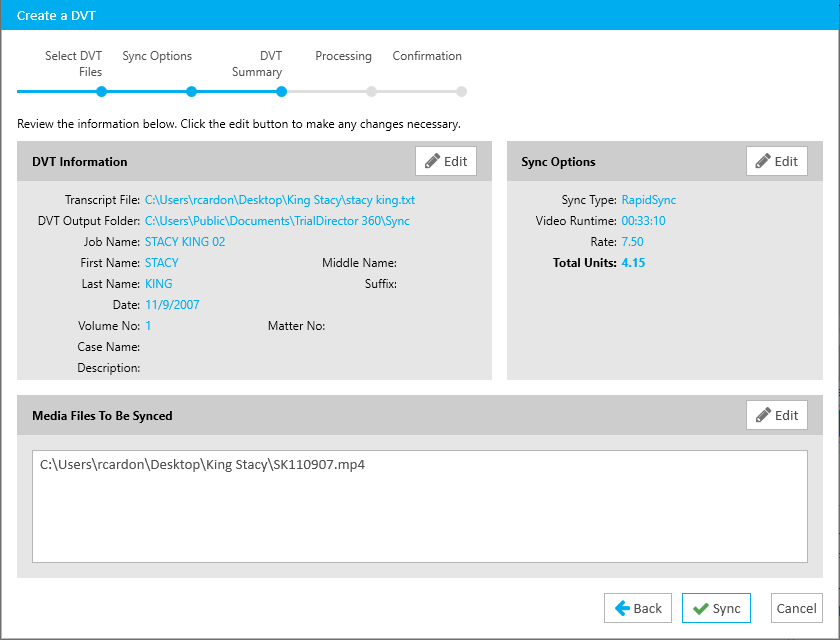
The DVT Summary provides an overview of the information determined in the steps previously and provides the cost of the synchronization job:
If the videographer sees an error in any of the summarized information, she clicks the edit symbol within the frame header. She is then taken to the corresponding step in the wizard where she can make any corrections.
For example, if she finds the wrong synchronization option is selected, she clicks the edit button, makes the change, and returns to the DVT Summary.
When she is ready to begin the synchronization process, she clicks Sync.

The processing step goes through three phases:
Once the entire process is complete, the wizard automatically shows the next step.
Note: On TrialDirector360.com, step 4 is the DVT summary.

Here, the wizard shows the videographer the synchronization was completed successfully. Now the videographer has the option to create another DVT, view the DVT in the Quality Control tab, or view it in the Transcripts tab.
Note: On TrialDirector360.com, SYNC uploads the files to the server. If auto-billing is turned off, and there are not enough Sync Units for the synchronization on the account, the job must be approved on the SYNC Start Page before the synchronization process continues.